Monday, October 11, 2010


On Saturday, 10-9-10, RV12 N399FP had her maiden flight!


She flew very well. I transitioned using a high-wing CTLS S-LSA and the RV12 is easier to land and takeoff. The plane feels solid and controlling it requires just fingertips on the joy stick.

I have 12 takeoffs and landings so far. The next task is flying off the required FAA test hours and filling out the production acceptance procedures that Van's requests. This will require a lot of flying incorporating all of the maneuvers that the aircraft is safely capable of.

After the conclusion of that, I will be free to travel anywhere and carry another person. Now some have asked me if I would take my little dog, Loocie, with me but she means too much to me to risk it. I'll take anyone else though.

My other goal is to paint it in time for Oshkosh next summer.

This photo is known as the "RV Grin".


Thanks for viewing my blog.

Frank

Wednesday, September 8, 2010

Wow folks, it has been five months since I have updated my blog. That is pitiful and I have no excuse. But I have been busy since then.

The next step in the airplane construction is the engine and avionics. This was the event where I wrote the two largest personal checks ever. Talk about being choked up. But the engine and avionics packages came complete, intact and undamaged.

I first installed the servos for the two-axis auto pilot option. That required the installation of additional structural bracketry which was difficult to install at this stage of construction but was accomplished none the less.

Then attaching and wiring the servos, one for roll control (flaperons) and one for pitch control (stabilator). The wonderful thing about this Van's RV12 kit is that all of the parts are included - all nuts, bolts, washers, fittings, clamps, etc. This means no shopping trips to Home Depot (airplane people don't really buy hardware there, do they?) or Spruce aviation hardware on the web. It also means that all of the parts and pieces and bits are exactly right for the intended application. It offers a lot of confidence to me, the builder and eventual flier.


The instrument panel was prewired with all of the switches and fuses and connectors and was a simple matter to connect computer style db cables between the radio, transponder, GPS and Dynon180 EFIS.
(Electronic Flight Information System). This glass panel replaces the six common round, mechanical gauges previously found in airplanes.

I had to mill a rectangular slot in the panel to install the auto pilot control head and that fit perfectly. The next task was the getting the airframe on it's gear.

Then came the installation of the fire wall forward equipment or FWF as those in the know call it. This included all of the wiring and relays and starter solenoid and battery and 12 volt connectors and so on. 
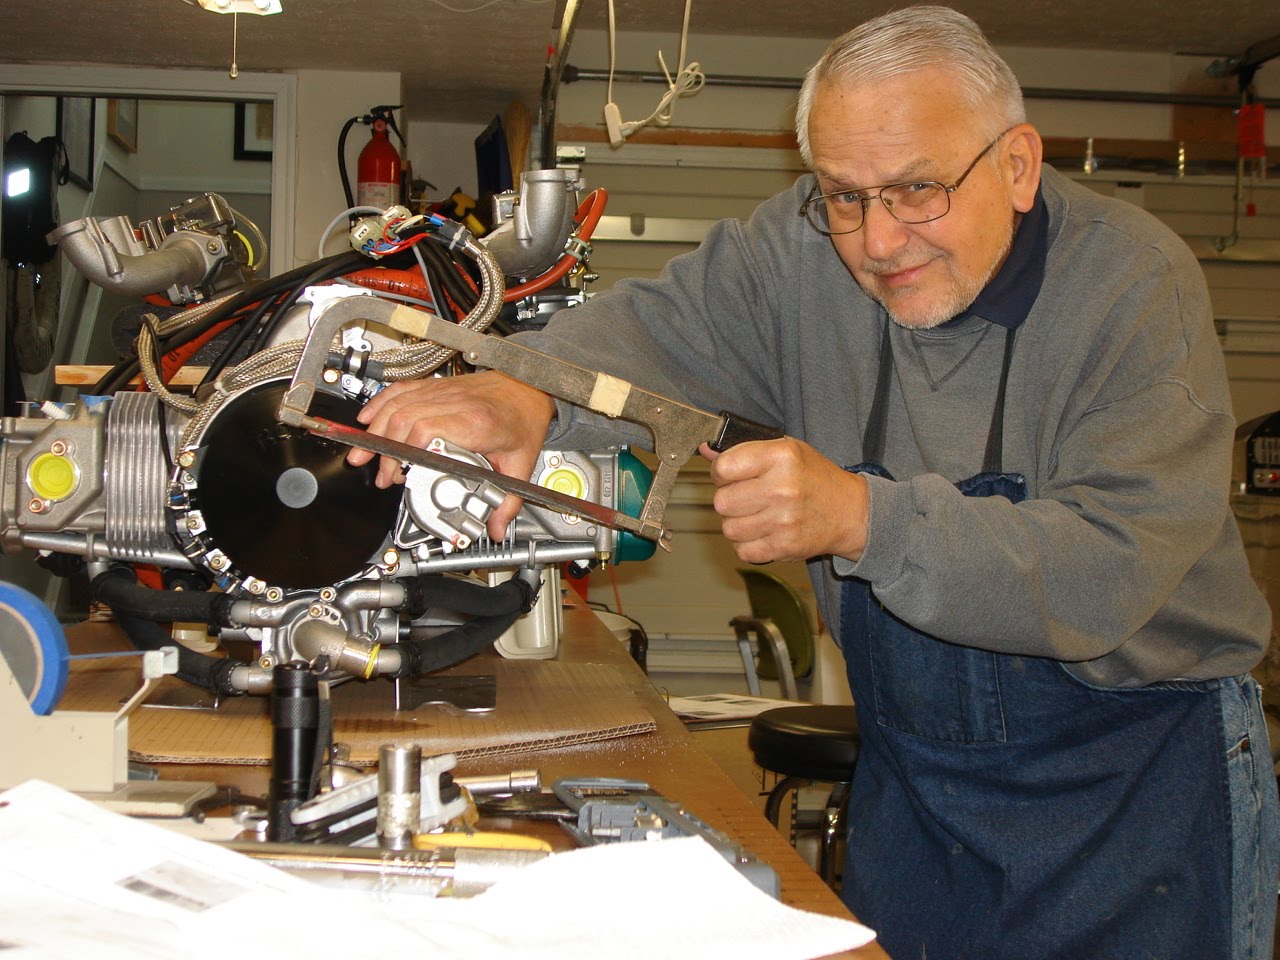
Then the engine. The single largest cost item had as it's first instruction, "take a hacksaw and saw a lug off of the starter motor". Gulp! It was not needed in this application and would interfere with the engine mount anyway.

Then the entire top of the engine had to be stripped to allow the precise fitting of a cooling shroud for the cylinders.

This engine is unlike other aviation piston engines in that it has air-cooled cylinders but water-cooled cylinder heads. That will necessitate a water radiator. The engine was re-assembled and then mounted to the aircraft. Gee, I thought that maybe this airplane thing will work out after all. Then came the fitting of the engine cowling, the glassing of the radiator cooling duct, the fitting of the oil radiator, attaching the propeller and the spinner with the little pitot tube sticking out of the center looking like a miniature machine gun.
This test was determining the cylindricity of the pitot tube.

At this stage, two small lower fuselage close-out pieces were riveted and that was that!
Now things were coming together really fast.

At this point, pretty much everything was done that I could do in my garage. The vertical stabilizer, horizontal stabilator and wings had to be attached to continue. Out to the airport. My two crew, Terry the neph and Dan the friend since 1964. On the trailer.

Now in the hanger after all the remaining stuff is attached. Now control cable tensions had to be set and clearances set for all moving parts. Nothing can stick or jam

A fuel system integrity and fuel pump performance test was done. The engine, having a dry sump, has to have the oil system purged to insure oil is where it is supposed to be prior to the first start.

Then came the first start. My crew was there with fire extinguishers and my S.O.was there for support and picture taking. Wow! she is ALIVE!

Following that was calibration of the static system and pitot system. Then an software update for the Dynon was done using a laptop with downloaded programs and a computer port in the airplane. Everything has worked well so far.

Taxi tests were performed and on the third one, my left tire went instantly flat. This occurred on the main taxiway and I had to have the plane ignominiously towed to the repair hanger. The inner tube had a slice in it, not from being pinched but more like being cut with a box cutter.

All I can imagine is that during this tube's transit from it's origin to Oregon, perhaps someone wrapping or unwrapping caused the cut. The scary thing though is it held air since I originally inflated it in May and there were two previous taxi tests. I am glad it failed now instead of during my first landing. Yikes! Somebody up there likes me.

All that remains is a fuel system calibration and a compass calibration. I am still waiting on the FAA for my registration so I can hire a DAR for the airworthiness inspection. I've been told that when the weight of the paperwork equals the weight of the plane, then the FAA will be satisfied. After that inspection - first flight.

I'll post the results.

Thanks for reading my blog.

Saturday, April 3, 2010

775 hours have been put into this project and one year and five months have elapsed since I received the first kit.


It has been a very interesting and rewarding experience.

This is the wooden jig that Van's recommends constructing from the packing crates to place the rudder pedals correctly for setting the cable length. These guys are so very clever.


I have finished the rudder cables which required placing the fuselage on the bottom level of my work dolly to clear the low ceiling in my garage. This also enabled me to work on the canopy which is almost complete.


I also had an opportunity to sit in the cockpit, grab the joystick and make all sorts of airplane noises.


One part of the project that was unexpected required the construction of a fiberglass fairing at the base of the canopy aft of the front cowling. After some expert tutelage from Jeff Shutic, a master at resins and fiberglass, I came up with a pretty good result.


Another task is the assembly and sealing of the fuel tank. It is a smelly, sticky and unpredictable task. I would prefer to pay a couple of hundred bucks for a poly or welded aluminum tank. But it is what it is. So far I have everything but the top, vent tube, sight glass and sending unit plate sealed. That will take place soon.
Even the gas filler cap is slick!


The day came when I had to bring the wings back from storage and fit them to the fuselage. This goes without saying that it is pretty important that the wings fit.


My helpful nephew, Terry, assisted me. The wings weigh about 88 pounds but they are impossible to move by oneself. I rented the stake truck that Home Depot has available and with a jury-rigged tailgate extender, we were able to to transfer the two wings, flaperons and wing cart in three trips. Luckily my storage facility is only about a mile away.

The wings do fit, the flaperons flap and ailerate too. The Jesus pins go in, sometimes with some force but having someone jiggle the wings helps.

All that remains of the finishing kit is installing the landing gear and brakes and tires.

The engine and avionics will arrive next week but the Rotax engine sensors are on back order.

As of Easter Sunday, there are sixteen weeks until Oshkosh.

Sunday, January 24, 2010

Well here I am again. To those of you who are patiently awaiting my updates, I am a dunce and a slow one at that.


The hardware in the picture is the Fiberglas tail cone material. It looks like this .. And this when completed...

I finished the engine cowling. Nothing very difficult but very tedious to sand-install-fit-remove-sand-install-fit-remove...you get the picture. I am pleased now that my airplane has a face


Even the little trapdoor for oil access came out well


It took 48 hours to finish the tail cone and engine cowling.
I then started on the fuel tank, preparing the metal but had to order the sealant. I switched instead to the electrical wiring. There seem to be a lot of wires in this plane. I will order the two-axis autopilot tomorrow when I place the order for the avionics kit. I included all of the optional wiring during the assembly

I tipped the fuselage on it's side and left off the turtle back and side skins. Good move on my part, suggested by both Jerry and Marty. Thanks guys. These guys really know how to blog.

I had a lot of trouble with the spar pins and the magnetic reed switches. This item should be improved to meet the elegance of design that the rest of the plane has. It is finicky and seems mickey mouse. I would have incorporated a micro switch. Anyway, after finally realizing that a reed switch was inoperative and a new one was received from Van's, I got that part completed.

I strung the rest of the wiring and installed the connectors for the autopilot. The bushings are full of wire. I don't think I can pass another strand of 22 gauge wire through some of them

Finally I wanted to install the joysticks. I passed the PTT switch wire through the joysticks.


But trouble arose when I tried to install them. The brass bushing used has an internal diameter of 0.245" on the print and the AN6 bolt has an external diameter of 0.247". This would be an interference fit of -0.002". Measuring the ID of the bushing shows it to be 0.241". This makes an interference fit of -0.006". Not going to work. A call to Van's is next.


At this point, I have 647 hours invested.

A wonderful coincidence occurred. At the suggestion of some of my fellow EAA chapter 127 members, I surfed the EAA website for technical counselors. I wanted a documentation trail of my build. Looking in the local Ohio section, I found a counselor in Oberlin Ohio. His name is Walter Edling. The first college I went to in 1965-66 was the Lorain County Community College and I received a degree in Mechanical Engineering Technology. One of my favorite professors was a Dr. Walter Edling. I figured this might be his son. When he answered the phone and I identified myself and asked him if he ever taught at LCCC he said "I remember you". So my old prof came over and was very supportive and complimentary about my build ethic and work shop. Dr. Edling is on the left. The other two are members of the EAA 255 chapter who wanted to see a RV 12.